Concealer is a total game-changer in any makeup routine, but the secret to getting that flawless, lifted, or brightened look all comes down to where and how you apply it. Ready to take your concealer skills to the next level? Here are some epic hacks that will completely transform your makeup game!
1. Placement for a Lifted Effect
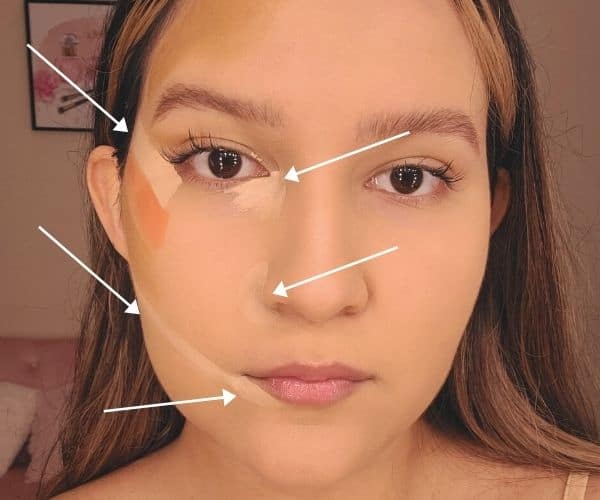
If you’re looking for that snatched, lifted look, it’s all about strategic concealer placement. Apply a lighter shade of concealer in three key spots:
- The inner corner of your under-eye area.
- The outer corner, blending towards your hairline.
- The side of your nose, blending towards your cheek.
This technique helps brighten and lift your entire face, giving you that sculpted, model-off-duty vibe.

2. Concealing Dark Circles
Got dark circles? No worries! Start by using a color-correcting concealer. If your dark circles have a purple hue, go for a peach-toned corrector. If they’re more neutral, opt for a pink-toned corrector. This trick helps neutralize the darkness before you apply your regular concealer, ensuring a smooth and even finish.
3. Corrector First, Then Concealer
Always start with a corrector to even out the dark tones, then follow up with your concealer to achieve your desired effect. For example, you can use your concealer to create that lifted effect mentioned earlier. The combo of corrector and concealer is a powerhouse duo for perfect under-eyes!
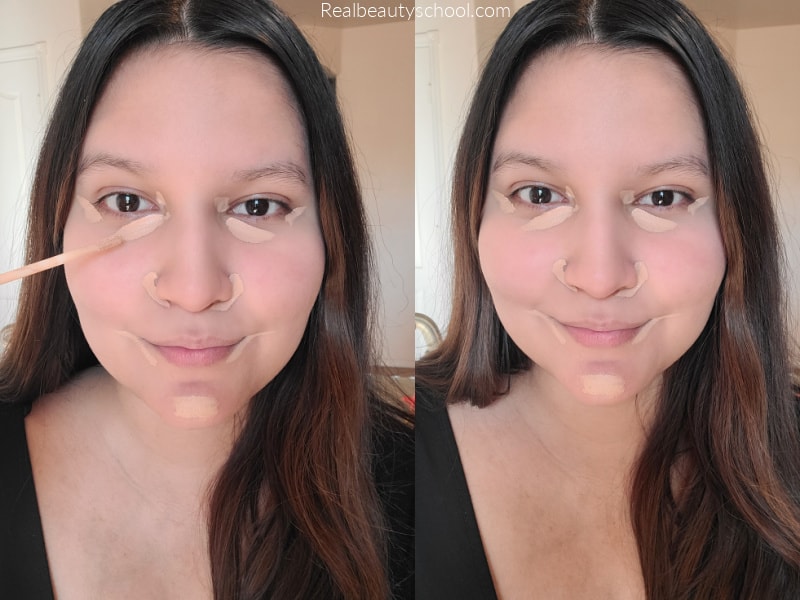
4. Less is More: Build in Layers
The key to flawless concealer application is to start small and build up. Apply a small amount of concealer, then layer it up to a max of 1-3 layers if needed. This prevents your makeup from looking cakey and ensures a more natural finish.
5. Skip Foundation Under the Eyes

Applying foundation under your eyes can lead to product overload, which equals creasing. Skip the foundation in this area and focus on concealer alone to keep things light and crease-free.
6. Work Eye by Eye
To avoid creasing, work on one eye at a time. This way, you can quickly blend out the product before it settles into any fine lines. Quick and precise blending is key here!
7. Let it Set Before Blending
After applying your concealer, let it sit for a couple of minutes before blending. This allows the product to set and gives you better coverage. Once it’s ready, use a makeup sponge to blend out any excess product, focusing on any creases before setting with powder.
8. Set with Powder (But Add a Twist!)
When setting your concealer, choose a powder with a different undertone to your concealer. For example, use a yellow or pink-toned powder to brighten and highlight the under-eye area even more. This trick not only sets your concealer but also adds an extra pop of brightness.
9. Spot Concealing for Flawless Skin
For small imperfections or blemishes, use a concealer that matches your skin tone exactly. Apply the concealer directly to the spot, covering up any imperfections without overdoing it.
10. Foundation Last for Spot Concealing
When spot concealing, always apply your foundation after you’ve applied your concealer. This ensures that the concealer blends seamlessly into your skin, giving you an even, flawless finish.
And there you have it! These concealer hacks will totally elevate your makeup game, giving you the perfect base every time. Whether you’re aiming for a lifted look, covering dark circles, or spot concealing like a pro, these tips will help you achieve flawless results. Time to get blending and let your concealer work its magic!