Today, we’re going to dive into the world of liquid blush the best techniques to apply liquid blush and how this is different from powder blush when it comes to finishes on the skin.
If you’re new to makeup or haven’t tried liquid blush before, let me tell you, it’s a game-changer!
And I’m here to explain everything about liquid blush and teach you 5 different ways to do it!
let’s begin
This post may contain affiliate links. That means if you click and buy, I may receive a small commission (at zero cost to you). Please see my full disclosure policy for details.

Liquid Blush vs Conventional Powder blush
Liquid blush is a blush formula that comes in a liquid form.
Unlike traditional powder blushes, it goes on smoothly and blends easily into the skin.
Liquid blush gives you a natural-looking flush that lasts longer than powder blush.
It’s perfect for achieving that dewy, fresh-faced look that’s all the rage these days.
One of the biggest benefits of using liquid blush is that it’s highly pigmented.
A little goes a long way, so you don’t need to use a lot of product to get the desired look.
It’s also great for people with dry skin as it won’t cling to any dry patches, and it won’t make your skin look cakey.v (IF CORRECTLY APPLIED, more on that below)
Related: Liquid vs. Powder blush (Difference and what you need to know!)
How to Choose the right Liquid blush for you
Alright, let’s talk about how to choose the right shade and formula of liquid blush for you!
This is an important step that can make or break your blush game.
First things first, let’s talk about skin undertones.

When choosing a liquid blush shade, it’s important to consider your skin’s undertones.
If you have warm undertones, go for shades with a peachy or coral hue.
If you have cool undertones, look for shades with pink or berry tones.
And if you have neutral undertones, lucky you – you can rock just about any shade!
Next, let’s talk about texture.
If you have dry skin, go for a liquid blush with a hydrating formula.
This will help to keep your skin looking fresh and hydrated throughout the day.
If you have oily skin, you might want to try a matte formula that won’t add any extra shine to your skin.
Lastly, let’s talk about Liquid blush formula types.
There are a few different types of liquid blush formulas, each with its own benefits.
Some formulas are more sheer and buildable, while others are highly pigmented and require a lighter hand.
One formula that is just in the sweet spot of being highly pigmented but easy to blend and buildable is the viral (and super affordable!) liquid blush from SHEGLAM.
If you haven’t I highly recommend you to get that blush, its really good and it’s like $5 or less. You can check out the blush here.
Some formulas have a dewy finish, while others are more matte.
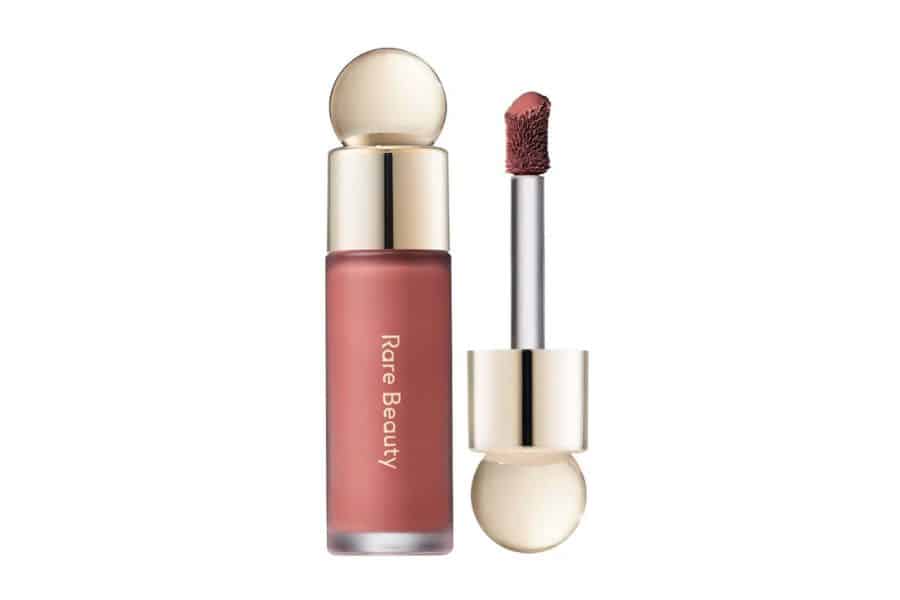
It’s a highly pigmented blush, so be careful to apply just the right amount, easy to blend and last hours!!
And its available in both, matte or dewy finishes.
It gives you the most natural blusy look we all want! You can check out the rare beauty blush here.
Ultimately, the formula you choose will depend on your personal preference and the look you’re trying to achieve.
If you’re not sure where to start, try a few different formulas like the ones we mentioned above and see which one you like best.
And don’t be afraid to mix and match – you might find that you like to layer different formulas for a custom look!
more on that below.
5 different ways to apply liquid blush
now that we have chosen our perfect liquid blush for our skin type and skin tone,
it’s time to pick the right blush application based on our face shape and what we want to achieve with the makeup look!
I’m gonna show you 5 different ways to apply your liquid blush.
Blush Application #1: To enhance cheekbones

It’s important to blend carefully to avoid any harsh lines or streaks. And reply your concealer if needed.
This technique is perfect for those who want to add definition and structure to their face.
Start by sucking in your cheeks to find the hollows beneath your cheekbones.
Then, apply a small dot of liquid blush to the center of this area and blend it outwards towards your hairline, using your fingers or a brush.
This technique will create the illusion of higher cheekbones and a more sculpted look.
Blush application technique #2: To add fullness
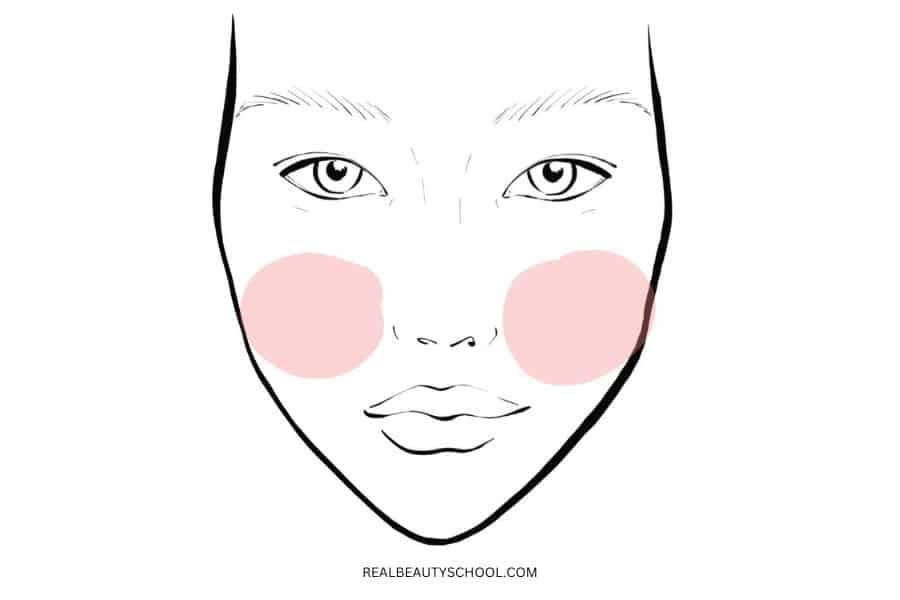
This technique is great for those who want to add a plump, youthful look to their cheeks.
Start by applying a small amount of liquid blush to the apples of your cheeks, then blend it out towards your temples.
This technique will give your cheeks a more rounded, full look.
It’s important to blend carefully to avoid any harsh lines or streaks.
Blush Application #3 Sunkissed technique

This technique is perfect for achieving a sun-kissed, glowing look.
Start by applying the liquid blush to the bridge of your nose, your cheekbones, and your temples.
Blend it outwards towards your hairline, using your fingers or a brush.
This technique will give you a radiant, bronzed look that’s perfect for summer.
Blush Application Technique #4: Lifted effect
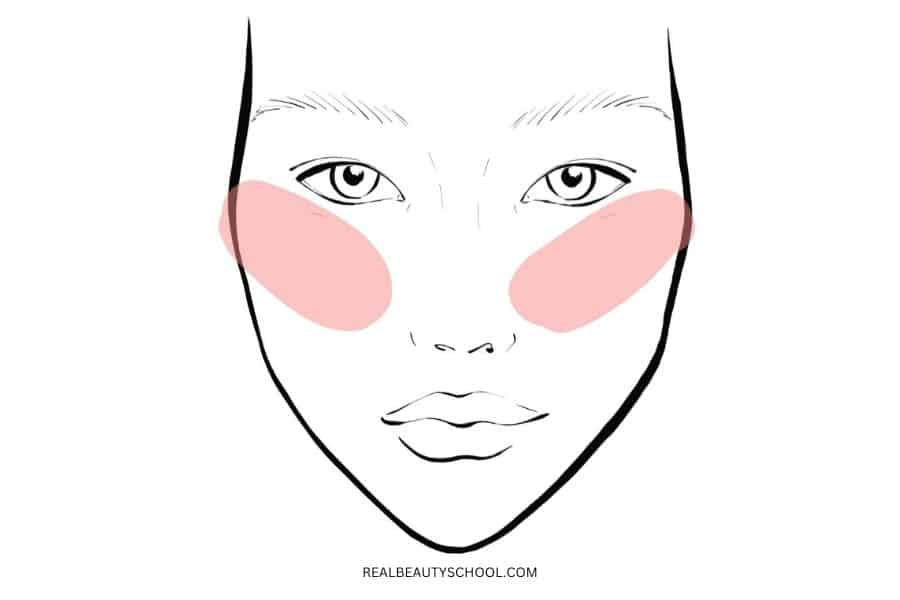
This technique is great for those who want to give their face a lifted, more youthful appearance.
Apply a small amount of liquid blush above your cheekbones, towards the temples.
NOTE: the key to this lifting effect is to apply your liquid blush, where we would normally apply the highglither, on the high points of our cheeks and even touching some of the under eye area.
This technique will give your face a lifted, more sculpted look.
Blush application technique #5: Traditional blush application

This technique is perfect for everyday wear, and it’s the most common way to apply liquid blush.
Start by applying a small amount of liquid blush to the apples of your cheeks, then blend it outwards towards your hairline.
This technique will give you a natural-looking flush that’s perfect for everyday wear.
And it basically goes well with any eye makeup/makeup look.
TIP: No matter which technique you choose, it’s important to start with a small amount of product and build up as needed.
It’s also important to blend carefully to avoid any harsh lines or streaks. Remember, liquid blush is highly pigmented, so a little goes a long way!
When applying your blush, Fingers, brush, or sponge?
Alright, let’s talk about the different techniques for applying liquid blush!
Using your fingers to apply liquid blush
This is the easiest and most convenient way to apply liquid blush.
Simply dab a small amount of the product onto the apples of your cheeks, then blend it outwards using your fingers.
This technique allows you to have more control over the application, and it’s perfect for when you’re on-the-go.
Just be sure to wash your hands before and after applying the product to avoid any transfer of bacteria.
Using a blush brush
This technique is great for achieving a more precise and controlled application.
Start by applying a small amount of liquid blush to the bristles of your brush, then gently buff the product into your skin using circular motions.
A brush can help you achieve a more blended and natural-looking finish.
Just be sure to clean your brush regularly to avoid any buildup of bacteria.
Using a sponge
This technique is great for those who want to achieve a more diffused, airbrushed finish.
Start by applying a small amount of liquid blush to the tip of your sponge, then gently dab the product onto your cheeks.
The sponge will help to blend the product seamlessly into your skin, giving you a flawless, natural-looking finish.
Just be sure to wash your sponge regularly to avoid any buildup of bacteria.
When it comes to choosing the right application technique, it really depends on your personal preference and the look you’re trying to achieve.
PRO TIP: Apply your blush with your fingers or brush AND blend with a sponge to get the best of both tools and a natural finish.
Experiment with different techniques to find the one that works best for you.
And remember, always start with a small amount of product and build up as needed.
Blending is key to achieving a natural-looking finish that won’t look harsh or streaky.
blending and finishing technique for liquid blush
Stipple
This technique involves using a tapping motion to blend the product into your skin.
Start by applying a small amount of liquid blush onto your cheeks, then use a stippling brush or your fingers to tap and blend the product.
This technique is great for achieving a natural-looking finish and can help to avoid any streaks or harsh lines.
Circular motion
This technique involves using circular motions to blend the product into your skin.
Start by applying a small amount of liquid blush onto your cheeks, then use a brush or your fingers to blend the product in a circular motion.
This technique can help to create a more blended and natural-looking finish.
Feathering technique
This technique involves using a light touch to blend the product into your skin, almost like you’re feathering it on.
Start by applying a small amount of liquid blush onto your cheeks, then use a brush or your fingers to gently blend the product outwards.
This technique can help to create a soft and natural-looking finish.
When it comes to finishing touches, there are a few things you can do to take your liquid blush to the next level:
Setting the blush
Setting your liquid blush with a powder can help it last longer and prevent any smudging or fading. Simply dust a translucent powder over your cheeks after applying the liquid blush.
Layering for more intensity
If you want to intensify the color of your liquid blush, you can always layer it by applying another coat after the first one has dried. Just be sure to blend it out evenly to avoid any harsh lines.
Adding highlighter for a radiant look
For an extra glowy and radiant finish, you can add a bit of highlighter to the high points of your cheeks after applying your liquid blush.
This will give you a dewy, luminous finish that’s perfect for any occasion.
final tips on how to apply liquid blush
Start with a little and build up: It’s always better to start with a small amount of liquid blush and build up the color gradually.
This will help you avoid any mistakes and allow you to control the intensity of the color.
Use a mirror: When applying liquid blush, it’s important to use a mirror to ensure that you’re blending the product evenly and achieving the desired look.
A handheld mirror or a vanity mirror with good lighting will make it easier for you to see what you’re doing.
Choose the right tools:
Whether you prefer using your fingers, a brush, or a sponge, choosing the right tools can make a big difference in the final result.
Experiment with different tools to find the ones that work best for you and your skin type.
In conclusion, applying liquid blush doesn’t have to be intimidating or complicated.
By following the steps and techniques outlined in this liquid blush, you’ll be able to achieve a flawless and natural-looking finish in no time.
Remember to start with a little and build up, use a mirror, and choose the right tools for the job.
So go ahead and give liquid blush a try!
With a little practice and experimentation, you’ll be able to master this technique and achieve a beautiful, glowing complexion that will turn heads wherever you go.


