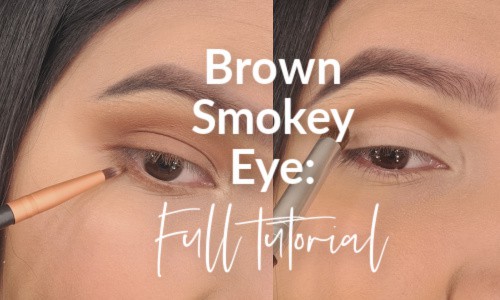
Brown Smokey Eye: Easy Step by step Tutorial
The Brown Smokey Eye Look is an easy eye makeup look suitable for beginners or pros that is perfect for a natural everyday look or a quick and simple night Glam Makeup.
I love this super easy smokey eye because it is super versatile, it doesn’t take a lot of time to do it, and you can match it with almost any lipstick and outfit!
I think this is the Eye makeup that every beginner should start with and the perfect Makeup technique to look stunning and elegant in minutes.
In general, for getting an easy Brown Smokey eye, you need to begin with a light beige shade, apply it on the brow bone and inner corner, then use a light brown eyeshadow for the crease and blend it, and finish the look with a dark brown shade all over the eyelid.

And in this ultimate guide, I walk you through every step, with some Pro tips that will make it even easier!
I have Hooded Eyes, so I’m covering some master tips for the perfect brown smokey eyes even for Hooded-droopy eyes.
The best part of this simple guide is that you can change the shades for adding more drama or keep it more natural going lighter, and you can change the final touch with the lipstick of your mood at that moment.
Let’s begin.
This post may contain affiliate links. That means if you click and buy, I may receive a small commission (at zero cost to you). Please see my full disclosure policy for details.
Brown smokey eye step by step tutorial
Step 1. Prime the eyelids
First, with your clean eyelid, apply an eye primer all over the lid to create an even skin tone on the eyelids and for having your eyeshadows all day set in place.
You can also use your concealer, but if you tend to have grease eyelids, it’s 100% recommend using an eyelid primer like the fabulous paint pot by MAC.
I have my eyebrows done before this tutorial because I have a full tutorial with pictures on how to do eyebrows. You check the complete step by step guide for the perfect eyebrows at home here.
for this tutorial I’m using this classic and amazing 350 eyeshadow palette by Morphe.
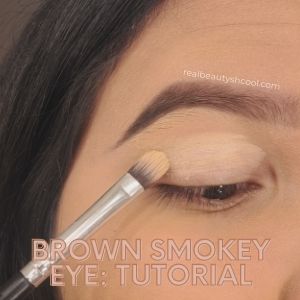
Step 2. Apply a light shade all over you lid
Next, we will be starting with the eyeshades, and this time we will take a natural light color shade. You can use beige, porcelain, bone color, and it has to be matte. Like one of the first 3 shades of the 350 morphe palette, the exact tone will depend on your skin tone. the darker your skin tone the darker the light shade should be.
Apply it all over your lid for setting the eyelid primer and to highlight the brow bone.
Step 3. Apply a light brown shade on the crease
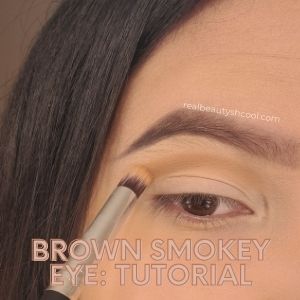
This step consists of seeking the lightest brown shade, preferably with a warm undertone.
Apply it on your crease with a small pencil brush and concentrate the color on the crease without reaching the inner corner and the brow bone area.
Take your time building the color adding more layers of the same eyeshade, and blend it again with a small fluffy brush to create a smooth, soft brown crease.
Pro-tip for Hooded eyes: Hooded Eyes tend to have the crease in a lower place then almond eyes, and for fixing this and have this fantastic brown smokey eye look, focus this transition light brown shade on a part between your natural crease and the brow bone.
That way, you will be building what I call a “Fake crease” that will open and lift your hooded eye.
Related Hooded Eye Makeup post: The Ultimate Guide to Apply eyeshadows for Hooded Eyes
Step 4. Apply a soft Brown Medium shade
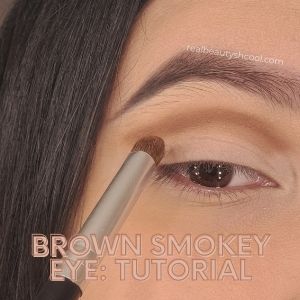
Next, take a medium brown eyeshadow and add it to on top of the previous step with a small pencil brush. First, Concentrate the color on the crease (or fake crease), and then with a small fluffy or blending brush, blend it well with out reaching the inner corner.
This time you can go down a little bit but do not touch the brow bone area.
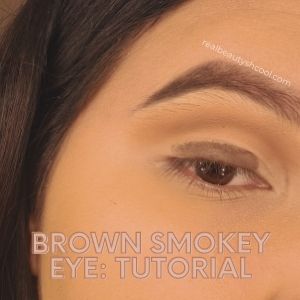
Step 5. Blend it well

Take a clean small fluffy brush and take the time to blend all the work you did.
That way, you will have a smooth brown smokey eye perfectly blended to continue with the darkest shades.
Related Makeup Posts: The Best Everyday Eyeshadow Palettes for Every Eye color!
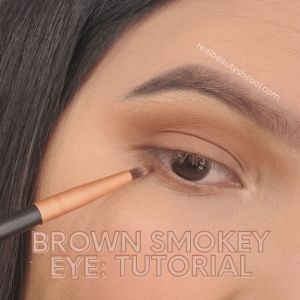
Step 6. Apply Dark brown pencil eyeliner
This step is to intensify more the look. The intensity of drama will depends on the tone of your brown pencil eyeliner. I recommend you to use a medium brown pencil eyeliner for this step.
Check this creamy brown pencil eyeliner with a built-in sharpener, that is for a super affordable price.
Pro tip: Heat your pencil eyeliner with a lighter for 2-3 seconds before using it to have a smooth, creamy brown pencil eyeliner that way. It will be more manageable.
Apply the pencil eyeliner on your lower lid, right next to your eyelashes line.
This will create a base for the next shade and will make it last longer.
Blend it well with your fingers or a pencil eye brush.
Step 7. Apply the darkest shade
Related Makeup post: The Complete List of Makeup Brushes and how to use them (correctly!)
After that, select the darkest brown shade for your brown smokey eye. This shade will be placed on top of the pencil eyeliner.
I’m using a dark brown with a warm undertone eyeshade. Add it with a medium fluffy brush and build your coverage and intensity that you want. blend it well.

Supposing you are using this look for a night out or a dinner party. In that case, I recommend you to go with a more dramatic coverage and for a natural-looking smokey eye look for the everyday Makeup, use a lighter dark brown with a warm undertone, and with a light to medium coverage on the lid.
Step 8. Same on the lower lash line
Now, do the same that we did on the eyelid but with a small brush.
Apply the lightest brown shade in the lower lash line next to the inner corner, then apply the medium brown shade on the middle, and in the outer lash line, use the darkest brown.
You can also opt for using only the light brown shade all over the lower lash line for a more natural look or intensity its drama applying the dark brown shade all over the lower lash line.
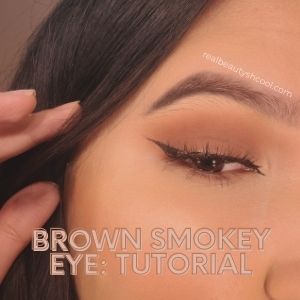
Step 9. Eyeliner for Smokey eye
Take the same brown pencil eyeliner and line your waterline, focusing on the third outer parts of your eye.
Next, do your winged eyeliner like usual with a waterproof black eyeliner on your eyelashes line.
For a more natural look, you can skip the winged eyeliner.
I’m doing a thin winged feline eyeliner for this tutorial. And I don’t share the full eyeliner tutorial here but I already have the complete Eyeliner guide with a full pictorial for beginners in another post that you can check it below.
Related Eyeliner Makeup post: How to do winged eyeliner step by step (with pictures)
Step 10. Mascara and false lashes
We are almost ready! I don’t feel any makeup look truly finished without a good pair of false lashes. And this is not the exception.
Curl your natural lashes with your favorite eyelash curler and then apply waterproof mascara on your natural lashes and the lower lashes.
You can totally leave the brown smokey eye look like this and rook a fantastic and complete makeup look!
However, If you loved how the eyes look open and bigger with false lashes, apply natural-looking false lashes.
I’m using these false lashes by Kiss that I genuinely love! Because it looks natural, but at the same time makes my eyes look bigger, more awake, and more dramatic.
Pro Tip for Hooded Eyes: Seek for false lashes that have a transparent strip. Black strip false lashes tend to have it thick for a hooded eye and make it look even more droopy.
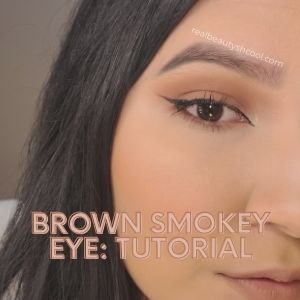
Final touches for the perfect Brown Smokey eye
Highlight your inner corner and your brow bone with a shimmer beige shade or with the same powder highlighter that you use.
Finish your other Makeup steps and apply a warmly peachy or warm pink blush. Apply your lipstick, and you are done!
This brown smokey eye is a super versatile makeup look to try with other different Makeup techniques, I tried it with nude lips, red lips, and glitter! Keep scrolling for the final results.
These are all the products that I’m using for this look (and I highly recommend)
Brown Smokey Eye Essentials
- Natural Matte and shimmer brown eyeshadow palette (Morphe 350 palette)
I loved this palette, but I could perfectly achieve this look with any other brown smokey eyeshadow palette.
The most popular ones that I recommend for this easy brown smokey eye are:
- Eyelid primer (paint pot by Mac)
- Mascara (Waterproof mascara by L’oreal)
- False lashes (Clear band false lashes by Kiss)
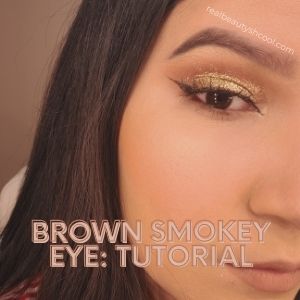
Brown smokey eye with glitter
This Tip is perfect for a night out party, or for a wedding or anything that requires a more dramatic brown smokey eye. Just apply a pressed gold or silver glitter on top of your eyelid and blend it with your finger.
It looks like this.
Brown smokey eye with red lips
Nude lips are an excellent option for an everyday look; however, I have to admit that nothing can compare with red lips.
Get the completely sexy and never-fails brown smokey eye look with red lipstick.
I’m using this red lipstick.

How do you do a perfect smokey eye?
The key for the perfect smokey eye consists of the transition of the colors. If you are doing a brown smokey eye, you need to select the right light brown color to start with the crease, then a medium brown shade for the transition and a dark brown shade or black shade for the eyelid.
The secret is selecting the right colors with the right undertones.
In this tutorial, I’m focusing on neutral and warm tones, and for that reason, I’ll never mix a cool tone brown shade.
Try mixing the eyeshades only with the same undertones no matter whats the tone of those shades.
Another Pro-tip is never to let the darkest shade cover the transition and the lightest shade; that way, we will be covering the smokey effect of the eye look.
Do smokey eyes look good on everyone?
I have to say this brown smokey eye makeup look is a never-fails look suitable for almost anyone.
But as a Makeup Artist and with my experience with the different eye shapes, I think it is not the best eye makeup look for monolids and Asian eyes. However, this is just a general rule like all the other Makeup rules, and you can just break it for your convenience! That’s the part the I loved about Makeup.
Final thoughts on Brown Smokey Eye look for beginners.
I love this easy Brown smokey eye look! It’s a must-do for every Makeup beginner, and its a classic elegant eye makeup look easy and suitable for so many different occasions. And it’s a perfect eye makeup look for blue eyes and brown eyes.
Pro tip: You can always try this smokey eye look with blue shades, purple shades, wine shades, or gray colors!
I hope you liked this Brown smokey eye step by step tutorial and inspired you to try it! If so, please tell me in the comments about how it was? I’d love to hear from you.
Related Makeup posts:
- How to Apply Makeup like a pro (17 tips you need to know)
- What is the right Makeup application Order?
- How to choose the right concealer shade for under eyes
- Best Natural dewy skin full face tutorial: Step by step