Makeup 101: learn how to do makeup
Makeup 101: Learn How to Do Makeup
Makeup isn’t just for covering up that pesky pimple or concealing wrinkles; it is proven to boost confidence and spark joy in those who wear it.
Not only are there mental health benefits to wearing makeup, but there are also physical health benefits.
Wearing makeup can protect your skin against harmful UV rays. Your face has some of the most sensitive skin on your body, so it is important to take care of it.
That’s why I love writing about all things makeup and skincare. But today, we are focusing on the basics.
Welcome to Makeup 101!
Today, we will be looking at the fundamentals of makeup, diving in with exactly how to teach yourself how to do makeup and some tips on how to apply foundation and eyeshadow, two makeup essentials.
No matter your age, or experience, this is the best place to start! Are you ready to learn all things makeup? Let’s get started!
This post may contain affiliate links. That means if you click and buy, I may receive a small commission (at zero cost to you). Please see my full disclosure policy for details.
How can I teach myself to do makeup?
There are several different ways to teach yourself how to do makeup.
Check out my top 3 tips for teaching yourself how to do makeup below.
Learn the Makeup Basics
When it comes to teaching yourself about makeup, it helps to understand makeup basics.
This includes makeup theory, fundamentals, and pro tips. Luckily, we at Real Beauty Schol have an online program that covers all of this and more!
Watch Others doing Makeup
When it comes to applying makeup, one of the best things that you can do is watch others.
One of the benefits of YouTube is that there are thousands of makeup tutorials for any makeup look you can imagine.
They range anywhere from makeup basics, to what looks like pieces of art on your face. When it comes to watching makeup tutorials, I recommend watching a video once all the way through, and then watching it again while following along. This leads to my third tip…
Practice
The age-old saying “practice makes perfect” is definitely relevant here.
The best way to get better at applying makeup is by practicing.
Now, if you don’t feel like practicing on yourself, you don’t have to. You can practice on a friend, or you can purchase a mannequin head to practice on!
No matter how you choose to practice, stick with it. Even if your eyeliner looks shaky or your eyeshadow is channeling raccoon vibes, it’s okay!
The more you practice, the better you are going to get. None of us are professionals right off the bat. Laugh it off, wipe that face, and keep going!
Another excellent way to practice (and relax) is by doing the makeup of face charts.
Makeup Book
Our Makeup Book is now available on Amazon! Get your copy here!
Makeup basics for beginners
Now that you know a few of the best ways to learn how to do makeup, let’s dive into some makeup basics.
Here you are going to find everything you need to know when it comes to makeup steps, what to apply, and more.
Before we dive into makeup basics, let’s touch on what you need before you grab a single makeup product.
What to Apply Before Makeup
When it comes to makeup application, you shouldn’t just grab a foundation and start applying. It is best to prep your face so that your makeup sets properly. Just follow the steps below!
- Wash your Face: It is essential to wash your face before you apply makeup. This will eliminate some of the oils that might be on your face, and create a clean canvas.
Pro Tip: Make sure your face wash fits your skin type (oily, dry, combination, sensitive etc.) for best results.
2. Apply a Serum: Serum is one of my favorite skincare steps because it goes deep into your skin’s layers and it is filled with vitamins and active antioxidants! It is especially great for mature skin.
3. Apply Eye Cream: Next, it is super necessary to apply eye cream under your eyes, outer corners, lids, and brow bone. This area is the most sensitive area of our face, and it has to be treated with care for preventing early wrinkles and expression lines in that area.
4. Apply Moisturizer and Facial Oil: No matter what type of skin you have, it is important to keep your face moisturized. Without Moisturizer, the skin is not correctly hydrated for the Makeup, and mixing that with matte makeup products will end in the skin begging for some hydration, causing your skin to produce more oiliness. So don’t neglect these important products!
5. Apply Sunscreen: Sunscreen is the final step when it comes to prepping your face. Even though some makeup products contain SPF, I always recommend applying sunscreen as an extra layer of protection.
What to Buy to build your Makeup Kit
As you begin on your makeup journey, you might be wondering, what do I need to buy as a beginner? Walking into a cosmetics store, or even the makeup aisle of a drug store can be overwhelming.
Before you throw everything in sight in your cart, check out my list below of what I believe are the most essential makeup products for a beginner.
- Primer
- Foundation
- Concealer
- Blush
- Contour
- Highlighter
- Brow Makeup
- Black Eyeliner
- Mascara
- Eyeshadow Palettes
- Set Of Lipsticks
- Translucent Powder
- Set Of Brushes
- Makeup Sponge
Also, check this post on the top starter makeup products you can find in the drugstore to build your makeup kit!
if you are looking to build a professional makeup kit I highly recommend getting my professional makeup kit checklist with the exact products I recommend. You can buy my makeup book on Amazon has a whole module on the essential makeup kit and more tips for beginners, intermidiates and pros.
Related: 27 Best Professional Makeup kits (Reviews + best full kits)
Fundamental Steps to Apply Makeup
Face Makeup

Now that your face and shopping cart are prepped and ready to go, it’s time to go through the steps to applying makeup!
Color Correction: The first step is to get your face color-corrected. I recommend applying a color correction concealer in your target areas.

For example, If you have redness, apply a greenish concealer in the specific area to cancel the undertones. Or, for very dark circles, you can use an orange color concealer.
Concealer: If you aren’t interested in a full-coverage look, you can apply foundation first. However, for a full-coverage makeup look, I suggest applying concealer, and then foundation (which is our next step).
Also read: My secret concealer hacks to STOP concealer from creasing under eyes
Foundation: Foundation is one of my favorite steps, and I will give you an in-depth guide to foundation below. But for now, remember that foundation creates the canvas for the rest of your makeup. You don’t need a lot of foundation to create a smooth and even face.
Also read: TOP 10 Luxury Foudation Dupes from the drugstore that are the same but cheaper!
Eye Makeup
When it comes to eye makeup, there are so many different directions you can go. However, here are the steps for two common eye makeup looks.
Natural eye makeup

- Lid primer
- Upper lid Eyeshadow
- Eyeliner (optional)
- Natural Eyelashes (optional)
- Mascara
- Down lid Eyeshadow (optional)
Related: Why your eyeshadows crease and how to finally stop it from happening again! (creams & powders)
Glamourous eye makeup

- Lid primer
- Upper lid Eyeshadow
- Glitter
- Eyeliner
- Eyelashes
- Mascara
- Down lid Eyeshadow
Eyebrows: When it comes to eyebrows, there are 3 easy steps to follow.
- Brow Pomade or pen
- Clear (or tinted) Eyebrow gel (to set everything in place)
- Concealer (to define and clean the brow bone)
Read this guide on How to get that model-like feathery fluffy Eyebrows even if you have super thin/no eyebrows at all! (Full tutorial)
Contour: Contouring is not essential, but if you are interested in contour, this is the time to try it. If you are a beginner, I recommend skipping to the next step for now.

However, if contour is something you are interested in, check more about it in this post where I cover how to apply cream contour and bronzer and how to pick the right shade for your skin
Blush: Apply your powder or cream blush!
Highlighter: For liquid highlighter, apply a small amount after all the cream/liquid makeup products, or apply powder highlighter to add a little natural shine to your look!
Lip Makeup: After you’ve done the rest of your face, your lips are the last step. Whether you want a simple gloss or a matte lipstick and liner, your lips are an essential part of your makeup look!
Set: Finally, set your makeup with a setting spray to complete the look!
More resources about the list above:
- How to apply lip makeup to make your lips look sexier and juicer!
- How to apply your bronzer/blush and highlighter to lift your face
- Best cream highlighters for every skin type and tone
- Best Makeup powders for Mature skin to set your makeup without drying out your skin
Skin type, Face shape, and eye shape for Makeup Application
When it comes to learning about makeup, there are a few things you should know about your face!
Skin Type
This is one of the most imporatnt things to know about your face when it comes to makeup and skincare. The five most common skin types are: oily, dry, combination, sensitive, and normal. Your skin type will influence the type of makeup that you buy.
For example, there is some makeup that is specifically designed with oily skin in mind (matte makeup is great for this). There is also makeup that is specifically designed to hydrate your skin, which is perfect for dry skin.
And there are a few ingredients you should avoid if you have sensitive skin. Understanding your skin type will help you on your next makeup shopping trip!
Face Shape: Learning your face shape will help you to understand contouring and how to highlight certain facial features. discover your face shape is super important.

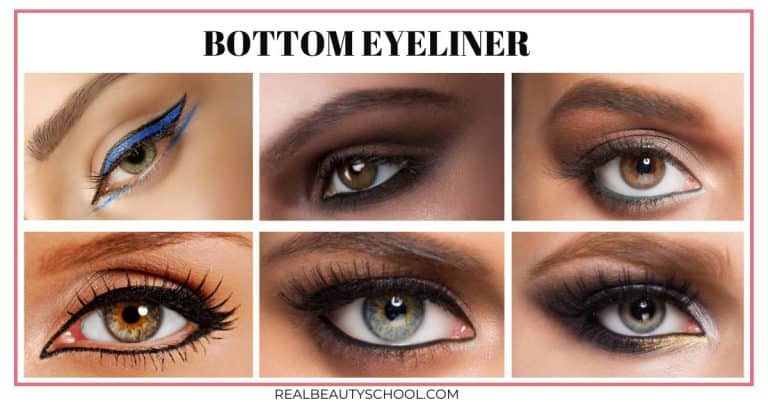
Eye Shape: Another important thing to know is your eye shape! This will influence how you do your eye makeup. Get to know is your have round, hooded, monolid, small, big, or almond eyes!

Makeup 101: tips for mature beginners

If you have mature skin, you are in the right place. I have a step by step guide on how exactly to apply makeup with your mature skin in mind. Check the post on How to apply makeup for mature skin where I apply makeup to a over 50 model.
first, you need to prep your skin to perfection!
The best skin prep routine to do before applying makeup at any age is a hydrating routine that includes:
- Serum
- Moisturizer
- Face oil (yes, facel oil)
After 20 years old, a person starts to produce less collagen in their skin, resulting in skin that becomes thinner, fragile, sensitive, and combined with less elastin produced, wrinkles and dry skin start to appear over time.
We want to avoid this as much as possible. That is why prepping your skin with ultimate moisture is the best way to go!
Next, there are 3 important makeup products to lay the foundation for any makeup look: color correction, primer, and foundation.
Step #1: First you should start with primer, which is one of my favorite products for mature skin. While it doesn’t eliminate wrinkles, it does reduce the appearance of them, as well as pores and fine lines.
Here’s a list of my top picks for primers to reduce the appearance of fine lines and wrinkles.
Step #2: After you apply primer, color correcting is next.
If you have dark spots, dark circles under your eyes, and/or sunspots darker than your skin tone and your skin tone is light to medium, I recommend using a peachy salmon color correction concealer.
If you have deep dark circles under your eyes try a darker shade like an orange color correction concealer.
Step #3: Next is foundation. When it comes to foundation, here are a few tips specifically for mature skin.
- Pick a full coverage foundation
- CC creams are your best friend
- Use lightweight, liquid formulas
- Apply your foundation with a brush and blend with a makeup sponge
Step #4: If you want to contour, there is a best practice for mature skin. The best way to apply contour for aging skin is by using a cream contour and applying it to the side of the nose, below the cheeks, forehand, and jawline depending on the face shape.
NOTE: some mature skins don’t need contour at all, if you have skinny face, you definitely want to skip this step.
Step #5: Next you’ll want a subtle blush. The right way to apply blush for aging skin is by using a cream or liquid blush and applying it right above the cheeks. This blush technique makes the face look more lifted.
Step #6: Now it’s time to pick out an eye shadow color!
A common question I get is: should I avoid certain colors now that my skin is aging?
The answer: no! Of course, there are colors that will look better than others, but there are no rules when it comes to what makeup makes you happy!
Aging eyes, like any other type of eyes, are free to use and combine shades like blue, pink, green, silver, golden, and purple just like any other.
Based on your eye colors, you can choose shades that will enhance your eye.
For example, if you have brown eyes, a purple or blue color goes amazing. For blue eyes, try a cooper, bronze, and blue shades to make your blue eyes pop even more.
Step #7: Let’s conceal those fine lines and wrinkles. The right way to apply concealer for aging under eyes is by using a hydrating full coverage liquid concealer and applying it with a brush and placing one drop in the inner corner and one drop in the outer corner.
After that, take a makeup sponge and blend the concealer with tapping motions until you get the desired results.
Step #8: Highlighter is essential for mature skin because it makes the skin look fresh and youthful. I like to apply a highlighter on the upper area of the checks, tips of the nose, inner corner of the eyes, and some on the chin.
Step #9: Now all you have to do is set your makeup, and voila! You have a gorgeous look, perfect for your mature skin!
Eyeshadow 101
If you wanted to dive a little deeper into eyeshadow as you learn about makeup, I’ve got you covered. Here are a few tips when it comes to all things eyeshadow!
Pick the Right Eyeshadow Color
✅ I highly recommend this eyeshadow palette for makeup beginners. It has an easy-to-use formula and it comes with a range of light to medium shades in both textures, matte, and shimmer.
While there are no rules when it comes to eyeshadow colors, I do have a few recommendations when it comes to picking out the right eyeshadow color for you. The best thing you can do is a pick a color that goes with your eye color. Check out the best pairings below:
Brown eyes: This is truly the universal color, which means you can wear whatever color you want! However, a few colors that look best for brown eyes are: purple, blue, bronze, and violet.
Green eyes: The best eyeshadow colors for green eyes are purple, burgundy, orange, bronzy, gold, pink, pastel pink, copper rose, and pearl.
Blue eyes: The best eyeshadow colors for blue eyes are bronzy, golden brown, yellow, orange, neutral brown, pink, silver and purple.
Hazel eyes: The best eyeshadow colors for hazel eyes are burgundy, warm browns, purples, blue, bronze and rose gold.
There is a RIGHT way to use glitter eyeshadow
The right way to apply glitter eyeshadow is by using a small synthetic brush, take 1-2 drops of glitter glue and place it on the desired area, wait 10 seconds for the glue to dry and with the fingers apply the glitter on top the glue.
Always prime your lids.
Whether you use an eyeshadow primer, foundation or concealer, is super important to prime your lids to enhance the color of your shades, even your eyelids skin tone and to make your makeup last longer.
Be careful with the reds.
Those beautiful red tones that are perfect for a Valentine’s Day makeup look can be more difficult to remove from your eyelids than other shades. Avoid using this tones to prevent having a hard time, and eye irritation when removing your makeup.
Eyeshadow Technique for beginners
I have a lot of tutorials on how to do different eyeshadow looks, but since we are focusing on Eyeshadow 101, I wanted to walk you through a basic day look.
- Start by applying an eyeshadow primer, Then set your eyelids with a translucent powder or face powder.
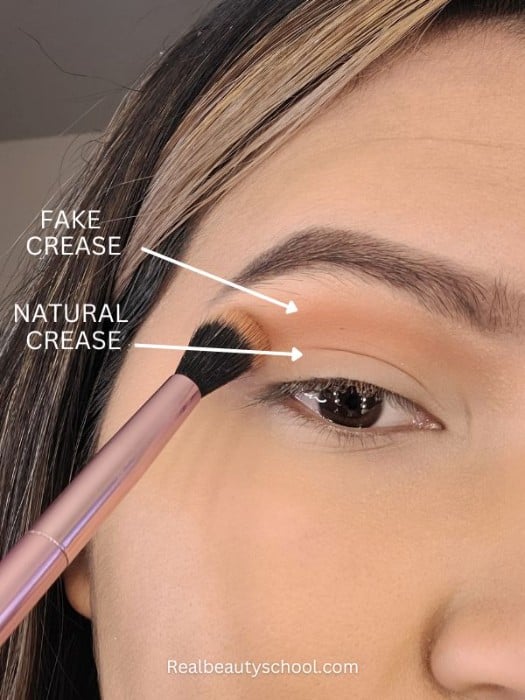
- Next, take a warm light transition shade and apply it directly to your crease with a fluffy blending brush and go back and forward from your outer corner to your inner corner of the eye.
- Build the color as much as you want by going back to your eyeshadow and reapply it on the crease.
- After that, take a darker but still neutral shade like a neutral brown tone and with a more precise pencil brush apply it on the outer corner forming an inverted V. Blend.
- After that, highlight the eyelid with a shimmery rose gold shade. Take a clean blending brush and blend all the colors until you see no harsh lines.
- To finish, take a light beige shimmery shade and highlight the brow bone and the inner corner of your eye. And apply the same medium brown on the bottom lashes area.
And that’s it! This is an easy look that, once you have it mastered, you can complete in about 10 minutes!
Also check the guide on how to properly highlight the inner corner step by step (with pictures)
Foundation makeup 10: How to apply foundation for beginners
Finally, let’s “cover” foundation 101! As I mentioned earlier, foundation is an essential part of the makeup routine, so I want to give you as many tips and tricks as possible when it comes to finding the perfect foundation, and applying foundation.
Finding the Right Foundation
There are a few different types of foundation to choose from. Here are my thoughts on each!
- Liquid Foundation: Liquid foundation is easy to manipulate with any tools or even directly with your fingers. There’s a different consistency on liquid foundations, and some people prefer liquid foundations because it feels like you can blend it quickly. However, liquid foundation doesn’t offer a lot of coverage.
- Foundation Stick: This full-coverage stick is perfect for covering up scars and blemishes. However, some people don’t like how thick and tacky this foundation feels.
- Powder Foundation: This type of foundation is super convenient to retouch makeup during the day, and perfect for oily skin. But you can’t get full coverage using this product alone, so it oftens needs to be combined with a liquid foundation.
Now that you know the different types of foundation, you should also know the three different types of foundation finishes. Check them out below.
- Matte: Matte is perfect for oily skin! It’s a foundation finish that drys out all the oiliness on your skin and usually lasts for hours.
- Dewy: The dewy finish is the best friend for dry skin! It can give you a natural, glowing, and youthful finish and it’s perfect for young skin as well.
- Satin: Satin falls in the middle of a matte and dewy finish. It is perfect for combination and mature skin.
Foundation Tips and Tricks

Now that you know a bit more about the different types of foundation and foundation finishes, let’s dive into a few of the best foundation tips and tricks!
- Find the Best Fit for your Skin Type: As I mentioned above, the different finishes are especially designed with certain skin types. If you have dry skin, a dewy finish will be best, whereas a matte product is the perfect fit for oily skin!
- Try a Makeup Sponge: While I love both sponges and brushes, I have to say: makeup sponges are amazing for beginners. You can blend effortlessly with a makeup sponge, and there isn’t a lot of skill required!
- Less is Better: Applying too much foundation will make your face look cakey and feel heavy. Instead, start with a thin layer of foundation, and build as necessary. Remember, less is more when it comes to foundation!
Also read: Why your foundation looks DRY, FLAKY, PATCHY or CAKEY and how to fix it
Final thoughts on learning how to do makeup
It’s no surprise that makeup is a passion of mine, but I hope this guide made you a little more passionate too.
There are so many ways that you can create that perfect makeup look, but I hope this guide gave you the “foundation” to start creating. If you found this guide helpful, don’t forget to share it with others and pin it for later.
Plus, let me know in the comments below what makeup tip you found the most helpful. I can’t wait to hear from you!
Our Makeup Book is now available on Amazon! Get your copy here!